오라클 클라우드의 무료 파티션 용량은 200G까지 가능한데요.
두개의 VM이 무료니 각각 100G까지 확장이 가능합니다.
먼저 GUI에서 용량 확장을 해야 합니다.
오라클 클라우드 블록 스토리지 용량 증설
OCI 관리자에서 블록 스토리지 - 부트 볼륨에 가서 용량을 증설해야 합니다.

편집을 누르고 용량을 증설 합니다.

저는 100G로 설정하였습니다.
이후 설정해야 하는 것은 rescan 명령어로 볼륨을 다시 검색하고, 파티션을 증설해야 하는데요.

먼저 rescan 명령어를 가이드에 따라 쳐줍니다.
sudo dd iflag=direct if=/dev/sda of=/dev/null count=1
		echo "1" | sudo tee /sys/class/block/sda /device/rescan
그리고 파티션 증설을 해줘야 하는데요.
파티션 증설은 OCI의 oci-growfs으로 하면 되는데, ubuntu에서는 추가가 안됩니다.
아래 명령어로 OCI가 설치되나 oci-growfs 명령어가 먹지 않습니다.
혹시 아시는 분은 댓글 부탁드립니다.
bash -c "$(curl -L https://raw.githubusercontent.com/oracle/oci-cli/master/scripts/install/install.sh)"그래서 그냥 수동으로 파티션을 증설하였습니다.
먼저 lsblk로 블록 용량을 보았는데 아직 50G로 설정되었습니다.
parted로 수동으로 잡아주었는데요.
ubuntu@test3-vm:~/bin$ lsblk
NAME    MAJ:MIN RM  SIZE RO TYPE MOUNTPOINTS
loop0     7:0    0 21.6M  1 loop /snap/oracle-cloud-agent/49
loop1     7:1    0  102M  1 loop /snap/lxd/23545
loop2     7:2    0   59M  1 loop
loop3     7:3    0 21.6M  1 loop /snap/oracle-cloud-agent/47
loop4     7:4    0   59M  1 loop /snap/core20/1740
loop5     7:5    0   43M  1 loop /snap/snapd/17885
loop6     7:6    0 59.1M  1 loop /snap/core20/1782
loop7     7:7    0 43.2M  1 loop /snap/snapd/17954
loop8     7:8    0 49.1M  1 loop /snap/core18/2658
loop9     7:9    0 49.1M  1 loop /snap/core18/2671
sda       8:0    0  100G  0 disk
├─sda1    8:1    0 49.9G  0 part /
└─sda15   8:15   0   99M  0 part /boot/efi


ubuntu@test3-vm:~/bin$ sudo  parted /dev/sda
GNU Parted 3.4
Using /dev/sda
Welcome to GNU Parted! Type 'help' to view a list of commands.
(parted) unit s
(parted) print
Warning: Not all of the space available to /dev/sda appears to be used, you can
fix the GPT to use all of the space (an extra 104857600 blocks) or continue with
the current setting?
Fix/Ignore? f
Model: ORACLE BlockVolume (scsi)
Disk /dev/sda: 209715200s
Sector size (logical/physical): 512B/4096B
Partition Table: gpt
Disk Flags:

Number  Start    End         Size        File system  Name  Flags
15      2048s    204800s     202753s     fat32              boot, esp
 1      206848s  104857566s  104650719s  ext4

(parted) rm 1
Warning: Partition /dev/sda1 is being used. Are you sure you want to continue?
Yes/No? y
Error: Partition(s) 1 on /dev/sda have been written, but we have been unable to
inform the kernel of the change, probably because it/they are in use.  As a
result, the old partition(s) will remain in use.  You should reboot now before
making further changes.
Ignore/Cancel? i
(parted) mkpart
Partition name?  []?
File system type?  [ext2]? ext4
Start? 206848s
End? 100%
(parted) print
Model: ORACLE BlockVolume (scsi)
Disk /dev/sda: 209715200s
Sector size (logical/physical): 512B/4096B
Partition Table: gpt
Disk Flags:

Number  Start    End         Size        File system  Name  Flags
15      2048s    204800s     202753s     fat32              boot, esp
 1      206848s  209713151s  209506304s  ext4

(parted) exit
  align-check TYPE N                       check partition N for TYPE(min|opt)
        alignment
  help [COMMAND]                           print general help, or help on
        COMMAND
  mklabel,mktable LABEL-TYPE               create a new disklabel (partition
        table)
  mkpart PART-TYPE [FS-TYPE] START END     make a partition
  name NUMBER NAME                         name partition NUMBER as NAME
  print [devices|free|list,all|NUMBER]     display the partition table,
        available devices, free space, all found partitions, or a particular
        partition
  quit                                     exit program
  rescue START END                         rescue a lost partition near START
        and END
  resizepart NUMBER END                    resize partition NUMBER
  rm NUMBER                                delete partition NUMBER
  select DEVICE                            choose the device to edit
  disk_set FLAG STATE                      change the FLAG on selected device
  disk_toggle [FLAG]                       toggle the state of FLAG on selected
        device
  set NUMBER FLAG STATE                    change the FLAG on partition NUMBER
  toggle [NUMBER [FLAG]]                   toggle the state of FLAG on partition
        NUMBER
  unit UNIT                                set the default unit to UNIT
  version                                  display the version number and
        copyright information of GNU Parted
(parted) quit
Information: You may need to update /etc/fstab.

ubuntu@test3-vm:~/bin$ lsblk
NAME    MAJ:MIN RM  SIZE RO TYPE MOUNTPOINTS
loop0     7:0    0 21.6M  1 loop /snap/oracle-cloud-agent/49
loop1     7:1    0  102M  1 loop /snap/lxd/23545
loop2     7:2    0   59M  1 loop
loop3     7:3    0 21.6M  1 loop /snap/oracle-cloud-agent/47
loop4     7:4    0   59M  1 loop /snap/core20/1740
loop5     7:5    0   43M  1 loop /snap/snapd/17885
loop6     7:6    0 59.1M  1 loop /snap/core20/1782
loop7     7:7    0 43.2M  1 loop /snap/snapd/17954
loop8     7:8    0 49.1M  1 loop /snap/core18/2658
loop9     7:9    0 49.1M  1 loop /snap/core18/2671
sda       8:0    0  100G  0 disk
├─sda1    8:1    0 99.9G  0 part /
└─sda15   8:15   0   99M  0 part /boot/efi
다시 lsblk로 잡으니 99.9G로 정상적으로 증설된 것을 알 수 있습니다.
reboot로 재부팅 해줍니다.

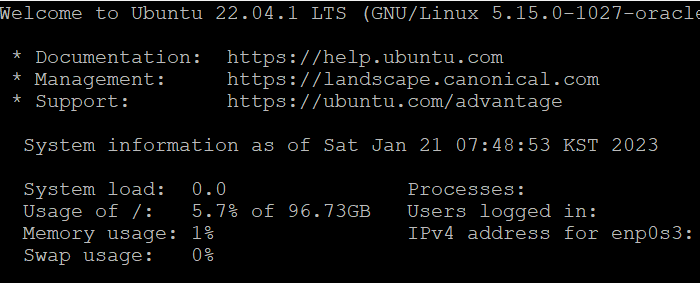
재부팅 이후 다시 파일 정보를 보면 96.73G로 정상적으로 업데이트 된 것을 확인할 수 있습니다.

그럼 잘 사용하시기 바랍니다.
'Blog' 카테고리의 다른 글
| 티스토리 2차 도메인 연결 오류 - 연결하려는 도메인의 유효한 인증서를 찾을 수 없습니다. (0) | 2023.01.25 |
|---|---|
| Docker 기본 명령어 알아보기 (0) | 2023.01.22 |
| Nginx 명령어 알아보기 (0) | 2023.01.12 |
| lets Encrypt 인증서 삭제하기 (0) | 2023.01.12 |
| 티스토리 2차 도메인 등록시 문제점 해결하기(리다이렉션, 댓글) (0) | 2022.11.18 |